|
Data Model Specification dialog box |


|
Use this dialog box to specify a data model for the currently active Predictive Systems Lab document worksheet. To do so, set each sheet column to the particular use required by the model, as follows:
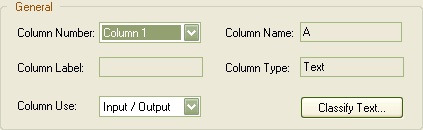
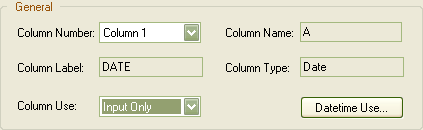
General
Lists all columns in the document worksheet. Select the columns, one by one, to specify the role that they play in the system.
Displays the alphabetic name of the currently selected column number.
Displays the column label of the currently selected column number.
Refer to the Label Column command for additional information on this subject.
Displays the type of the currently selected column number.
Refer to Cell and Column Types in Predictive Systems Lab for a complete discussion of the subject.
Lists all possible uses for the selected column number.
Not Used
Select this option to exclude the currently selected Column Number from the model.
Input Only
Select this option to use the currently selected Column Number as an independent variable for the model.
Output Only
Select this option to use the currently selected Column Number as a dependent variable for the model.
Input / Output
Select this option to use the currently selected Column Number as both, independent and dependent variables to the model. Note that in this case, the independent instance of the variable is restricted to past states.
Text Use
If the currently selected Column Number is of type (Column Type) Text and the Column Use value is other than Not Used, this dialog box displays the Text Use button you can click to specify a method by which to translate text values to numerical values (see figure below).
Refer to the Text Variables Specification dialog box for additional information on this subject.
Datetime Use
If the currently selected Column Number is of type (Column Type) Date, Time, or Datetime, and the Column Use value is other than Not Used, this dialog box displays the Datetime Use button you can click to specify a method by which to translate date and time values to numerical values (see figure below).
Refer to the Date and Time Variables Specification dialog box for additional information on this subject.
If the Column Use value for the current column is set to Input Only or to Input / Output, you must choose one of the time delay options:
Select this option if the delay vector for the currently selected column is linear in time; that is, if it can be specified by a linear equation in the form:
Increment * Vector Element + Start Offset
In addition, you are also required to supply the following information:
Type the dimensionality of the input vector corresponding to this variable.
Type the value for the lapse in time at which to start forming the input vector corresponding to this variable. A value of two (2) in this box, for example, would instruct Predictive Systems Lab to start forming the input vector corresponding to this variable two time steps prior to the current time position.
Type the value for the increment in time at which to retrieve subsequent elements of the input vector after the Start Offset value. A value of one (1), for example, would instruct Predictive Systems Lab to continue the formation of the input vector corresponding to this variable one time step prior to the previous vector element position in time.
Select this option if the delay vector for the currently selected column is sparse or not linear in time. In addition, you are also required to supply the following information:
Type the dimensionality of the input vector corresponding to this variable.
Select from this box the vector element you want to position.
Type the value of your choice for the lapse in time at which to retrieve the vector element specified in the Delay Number value. A value of five (5), for example, would instruct Predictive Systems Lab to retrieve this element for the input vector corresponding to this variable five time steps prior to the current time position.
Check this box to specify you want to restrict the minimum value you can type into the Offset box for this vector element to one time lapse greater than the offset defined for the previous vector element. If you do not set this option, the minimum value you can type is not restricted only by the number of previous elements. Otherwise, all previous vector element Offset values can contract to their nearest possible values. This option has no effect on the first vector element.
Check this box to specify you want to restrict the maximum value you can type into the Offset box for this vector element to one time lapse smaller than the offset defined for the next vector element. If you do not set this option, the maximum value you can type is restricted only by the maximum delay allowed minus the number of following elements. Otherwise, all following vector element Offset values can expand to their nearest possible values. This option has no effect on the last vector element.
In order to simplify the task of defining variables, you can click any of the following buttons:
Click this button to copy the specifications for the currently selected Column Number to all previous columns of the active document worksheet. This tool is not available when the active Column Number corresponds to the first column of the document worksheet.
Click this button to copy the specifications for the currently selected Column Number to all remaining columns of the currently active document worksheet. This tool is not available when the active Column Number corresponds to the last column of the document worksheet.
Click this button to display the Variable Specification Copy dialog box for more flexibility in copying the specifications of the currently selected Column Number to the other columns.
Click this button to restore column specifications to the values prior to the current changes. Note that changing the current Column Number assigns the exiting column the set of changed values.
Once you achieve the model you want, click OK to save your changes and close the dialog box, or click Cancel to close the dialog box and discard all changes.
| If a previous model exists and no actual changes are made during this dialog box session, Predictive Systems Lab does not reset the current solutions for the previous model. |
Example
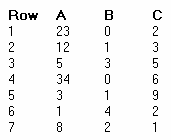
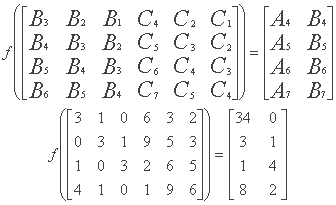
Consider a document worksheet with three (3) columns and the following data:
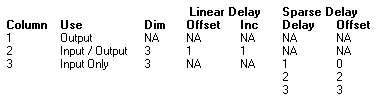
Where you declare the following model specification:
This specification will produce the following system of equations:
Refer to Data and System Models in Predictive Systems Lab for additional information on variables, and data and system models.
Sponsored
Try Predictive Systems Lab
Need Help?
Contact support